Showing posts with label Embroidery. Show all posts

Wednesday, September 3, 2014

What I'm Working on Wednesday

It seems I've taken a bit of a blogging break -- quite unintentionally. I have been keeping quite busy, but not finishing anything worth blogging about! Today, I have several projects in progress:

Embroidery

I'm currently working on some custom embroidery for a Christmas stocking order for my shop. I do all my embroidery by hand, so it is time consuming, but I love the way it turns out.


Fairy Tale Craft

I am in charge of this week's Fairy Tale Friday in my son's first grade class. I'm doing The Emperor's New Clothes and I'm cutting all the pieces they'll need to create some new outfits for the Emperor. I'm planning a more detailed post about this in the near future.


Days for Girls

In preparation for my upcoming Days for Girls Sewing Day, I am cutting as many pieces as I can. If you're interested in finding out more about my Sewing Day, check out this post. If you want to know more about Days for Girls, check out their website.


Reading

And of course, I'm always reading whenever I find (or make) a spare moment. I just finished up The Darkening Field by William Ryan. This week's selection is Rules of Civility by Amor Towles. Another book review post will be coming next week!


What are you working on this week?

Friday, June 20, 2014

8 Great Embroidery Patterns & Tutorials

I'm on an embroidery kick these days and wanted to share some of the awesome free patterns and tutorials I've found! (Click on the image to go to the original source!)


Bee Happy by Follow the White Bunny

Blue Wren's Nest by Cinderberry Stitches

Embroidered Photo Art by A Beautiful Mess

Hot Air Balloon by Spool and Spoon

Life is Beautiful by Baker Court

Make a Wish by While Wearing Heels

Negative Space Embroidery by Feeling Stitchy

Star Wars Embroidery by Wild Olive

Thursday, September 12, 2013

Quilted Sewing Satchel

I've been working on this one for a while and finally had some free time to finish it up this morning. If you'd like to see a tutorial on how I did my embroidery, check that out here.

I do a fair amount of embroidery. One of my favorite things about embroidery is how portable it is. But after several times of sticking my embroidery project in my purse and then stabbing myself with a needle when searching for my keys, I decided that maybe I need a small bag to keep my embroidery stuff in so that it is separate. And so, the quilted sewing satchel was born.


This was a pretty simple project. After completing the embroidery, the satchel only took about 30 minutes to quilt and put together. This could also be a great beginner project. I didn't take step-by-step photos, but here's a quick break-down of the process:

  • Decide on the size you want your completed satchel to be. Add 1/4 inch to each side for seam allowances.
  • Cut two pieces of your outer fabric and two pieces of your lining fabric to this size. Also cut two pieces of batting this size.
  • Create your "sandwiches." Stack your front pieces, wrong sides together, with batting between. Do the same with the back pieces.
  • Baste (loosely stitch) around the edges.
  • Quilt as desired. I did two vertical straight lines using a quilting stitch, then two horizontal straight lines. Without embroidery, a more complex quilting pattern could work well.
  • Place your quilted pieces right sides together and sew around the sides and bottom. Turn right side out.
  • Finish off the top using bias tape.
To keep my satchel closed, I added velcro to the inside lining. You could use any type of fastener you like, or leave it open.

{Linked on I Gotta Create, Life After Laundry, Embracing Change, Sunshine & A Summer Breeze, Willamette Valley Wonder Woman, Live Laugh Rowe, Rhinestone Beagle, Artsy Fartsy Mama, Crafty Blog Stalker, 36th Avenue, 7Alive, Sewlicious Home Decor}

Wednesday, August 14, 2013

Hand Embroidery Tutorial

I learned to cross-stitch when I was young and have enjoyed needlework off and on since then. Two years ago when I made quilted Christmas stockings for our family, I looked into paying for someone to embroider our names on the cuffs. Ultimately, I decided that I should try to do it myself instead. They turned out really well considering that I learned by doing. Since then, I have had several people see our stockings and say, "You did that by hand?!" So I thought I'd share my method in case anyone else is looking to learn how to do this.

Our hand embroidered Christmas stockings
Step 1: Lay It Out!

Your first task is to figure out exactly what text or design you want to embroider and the size it needs to be. I generally only embroider text, so it's not too hard to figure out how to lay it out. For our stocking cuffs, I simply measured the width of the stocking, marked the center, then lined up the text accordingly.

Next, lay it out on your computer, using whatever application you like. I generally use Illustrator. Choose your font style and size, then print out your words or design in solid black. Thicker fonts are easier to embroider neatly!


Step 2: Trace!

Trace your design onto your fabric using a pencil. I tape my paper to a window, line up the fabric over the top, and use the light to trace the shape. I have done this on various colors of fabric, but haven't tried black fabric. Any other color should work great!

Step 3: Stitch

Once your design is traced onto your fabric, it's time to do the actual embroidery. Place your fabric in your embroidery hoop and make sure it's nice and snug. I usually start on the left and work left to right, top to bottom. You want your embroidery to be smooth, so do your best to make your stitches even and straight. For text, use one stitch to span across the character. Do one stitch from top left across to the right, the come back to the left behind your fabric. Your next stitches will be parallel to the first one, making sure not to leave gaps between stitches. When you come to a curve, use a pivot point, as illustrated below.

My poorly designed diagram to illustrate my stitching method.

Depending on your fabric and thread colors, you may need to tie off and cut your thread often to avoid seeing lines across the back of your design. Patience is key! And don't be afraid to pick stitches out if you notice they are getting crooked. Straight and even stitches are the most important thing to make your embroidery look smooth.


More Tips for Embroidery Success

  • If you are using thin fabric, like cotton, a smaller embroidery hoop is easier to work with.
  • Use two or three strands of embroidery floss in your needle to make sure you have good coverage.
  • Don't put your design right on the edge of your fabric because it makes it really difficult to secure it in your hoop!

Wednesday, June 26, 2013

Hoop Art Round-Up

I have been seeing embroidery hoop art everywhere and I am loving it! I guess I need to dig out my embroidery hoop and get to work creating my own. In the meantime, here is a round-up of some of my favorite hoop art projects:


This piece made by Bev at Flamingo Toes is a classic and beautiful example of how to incorporate traditional embroidery with a more modern flair. I especially love the lace!


This one was made by Nicki at Il Magpie. I love this design and the vibrant colors she chose. I would love to do some free machine appliqué like Nicki did here. I'm just not sure I could do such a nice job of it!


Andrea at Knitty Bitties created this colorful hoop art (and several others). Click through to her post and check them out because they are all fantastic! I love how she pieced the various fabrics together and then incorporated the same fabrics into the bunting.


Bethany at Pitter & Glink provides a simple tutorial on how she made these lovely hoops. This might be a good starting point if you're new to embroidery. And sometimes simpler is better!


I love fabric flowers, so I had to include this beauty from Caroline over at Sew Caroline. I love the piecing, the lace, the flowers with button centers... and at the risk of making it too busy, I would venture to add a bit of lettering across the bottom section. This looks like a great use for some of my scrap stash!


And I think that Bronwyn at Queen B Creative Me wins by providing my absolute favorite hoop art collection! Of course, by including a matryoshka doll, she had pretty good chances of becoming my favorite. Now I want to whip up a similar collection for my daughter's walls.

So which one is your favorite?

Sunday, April 28, 2013

Silent Sunday Inspiration Board

Since I have been dealing with sick kids all week, I haven't had tons of crafting time. I have been too busy doing 7 loads of laundry in one day or sanitizing door knobs and light switches or deodorizing the house. Now that my miserable boy is asleep, I thought I would post some DIY projects I have come upon recently that I love.

Cross Stitch Chair
from My Poppet


 A Book For Dad


Arrested Development Hoop Art


Skeleton Party Invitations


Patchwork Pots

Tuesday, April 23, 2013

Magnetic Frames

Usually when I have time to spend on crafts, I use it to make new wreaths for my shop. Today, however, I decided to work on a project that I started a month ago: a magnetic frame. I actually plan to have three of these that coordinate, but so far, I only have the first finished.


This is made using a small plastic frame from the dollar store. My frame is approximately 3 x 2.25 inches. I removed the frame stand from the back of the frame so that I could attach the magnet. I removed the glass. I originally planned to put the glass back into the frame after it was wrapped, but the fabric added just enough bulk that I couldn't get the glass to fit. So actually, I broke the glass trying to force it back into the frame. Oops.

I cut my fabric into thin strips (1/2 inch wide) and used those strips to cover the frame. I added a small twist rose to one corner as well. The embroidery is done on solid gray to coordinate with the frame itself.

I have two more frames that are already covered in fabric, but I still need to do the embroidery. When I finish, I'll post the trio all together.

Sunday, April 21, 2013

My Greatest Hits

I haven't completed many projects this week, but I thought I'd share some of my pre-blog projects that I loved. Enjoy!

Sewing


Last year for Christmas, I made aprons for my nieces using a tutorial found on Tidbits. They turned out so cute and I have big plans to make one for Violet as well... as soon as I have a lull in my crafty project load. That might be never.


Inspired by my sister-in-law, I made hooded towels for both of our kids for Christmas as well. I added a strip of patterned fabric to make them a bit more fun. Hooded towels are a must-have with little kids.

Home Decor
One of the best ideas I ever had is one I don't have a photo of. Before Eddie was born, I had the brilliant idea to put a dimmer switch in his room. Our kids' bedrooms are ridiculously small, so we didn't have a place for a lamp. The dimmer switch has been a lifesaver -- during midnight nursing sessions, night terrors, and the current "afraid of the dark" phase.


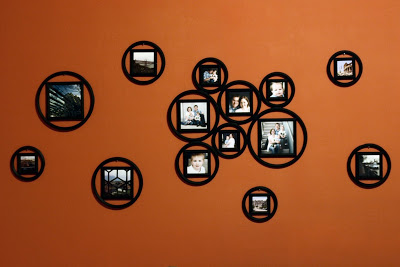
The second greatest idea I ever had resulted in this wall display. We got these collage frames from Target and originally just had one. But when we wanted to display our family photos in our living room, we needed something more substantial to fill the space. So I bought a second collage frame, then carefully cut the circles apart. I love the "floating bubble" effect.

Costumes


A couple of months before Eddie's 2nd Halloween, we read Where the Wild Things Are every day at least once. It was his favorite book, so we thought it would be very fitting to make Eddie a wolf suit so he could be Max for Halloween. This was my first attempt at sewing anything so complicated, so I modified an Eeyore pattern, adding buttons down the front, and totally improvising on the hat. It turned out surprisingly cute all things considered. Plus it gave me more confidence so I would dare to keep trying to make our kids' costumes. 


Violet went through a Little Mermaid phase where she would sing like Ariel all the time. This costume took a lot more creativity on my part. Luckily, I found the perfect fabrics at JoAnn. For the tail, I cut the fabric into a tail shape (one for the front and one for the back) and made the tail more like a skirt so that she would still be able to walk. Violet doesn't take small steps either... she really struts around. So I had to make the slit pretty high to accommodate. The tail has an elastic waist. For the top, I basically made a ruffle fabric onesie. I cut the ruffle fabric into onesie shape, sewing the crotch and sides. Then I added little fluttery sleeves and embellished with some sparkly ribbon. Ruffle fabric is already really stretchy, so I didn't have to worry about it fitting too well. A little dollar bin plastic jewelry finished it off.


Embroidery


Years ago, my brother moved into an apartment on his own. Once he didn't have roommates, he felt he could decorate as he wished and he requested a sign that said "Don't let the door hit you where the good Lord split you." I decided that if I was going to create such a sign, I should make it as gaudy as possible. So naturally I opted for an Old English style embroidery. Then Dave used his artistic skills to create the graphic, which I embroidered as well. The frame is just the icing on the cake.


After Violet was born, we decided we needed matching Christmas stockings, so I made them. I combined two different tutorials (FabricWorm & Prudent Baby). I embroidered our names onto the cuffs and they turned out beautifully.

{Linked on Sumo's Sweet Stuff, I Should Be Mopping, Keeping It Simple, Rain on a Tin RoofCraft-o-Maniac, Today's Creative Blog, Sugar & Dots, Made In A Day}

Monday, April 1, 2013

Some Wonderful Mystery


I spent Easter weekend visiting my in-laws. During some of the quieter moments, I worked on my newest edition of "Stitched Lit." I'm still finishing it up before posting it in my shop. Here is a preview of the embroidery:


Who can guess the book?

(Linked on Skip to My Lou, I Should Be Mopping, and Sew Many Ways)